One day (soon) my dream will become a reality, and when it does, I want my fireplace to not only be functional, but pretty.
After repainting the living room, I was shocked to see just how big my fireplace really is. Before, it was painted the same color as the walls so it blended right into everything else. Now, thanks to a fresh color palette, my fireplace is the first thing you notice when you enter the room. I just love it, and when you love something, you do your best to make it shine.
That being said, I knew what I needed to do next. Every great fireplace needs great accents on the mantel. I have been searching for months and just can't find the right pieces, or even ideas. I've searched Pintrest, blogs and a host of other things. I even looked at the home decor used on my favorite sitcoms to see what kinds of things TV characters (I guess technically TV set designers) are doing to decorate.
After weeks of searching for accent pieces, I found a cute vase that was half off at Hobby Lobby and then went to the flower section to see if there was something trendy but simple I could use to fill it with. Flowers were half off so I went to work - who pays full price for anything at Hobby Lobby? If you do, you shouldn't! Wait a week, it will be on sale.
I probably spent about 45 minutes with the flowers. Flower arrangements look so great online or on TV, but when it comes to actually putting something together myself, well, I just blank and have no idea what to do.
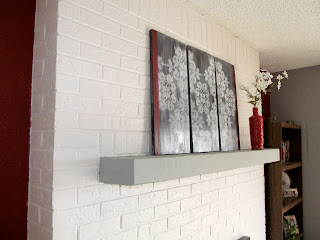
Next up, I decided to combine a few different ideas I found on Pintrest to create a three panel art piece to serve as the backdrop for whatever focal point I decided upon.
Lucky for me, I saved all of the wooden shelves from the built-in bookshelf that was formerly in my living room. They have been sitting in my garage for weeks waiting to be recycled and turned into something useful or interesting. For three of those shelves, today was their lucky day.
I wanted the final product to be comprised of four colors - red, black, grey and white. After all, the whole point of a DIY is not just to save money, but to make something that matches perfectly. First up was a rough coat of red paint.
Then I borrowed a technique I found on Pintrest and used soap on top of the spots that I wanted to keep red. Everything turned out ok in the end, but this technique didn't work as well as I hoped. Either I read the directions wrong, or this technique flat out doesn't work - still not sure which one.
Next up were coats of black and then a final coat of grey using that same, ineffective soap method.
After I realized the soap thing wasn't going to pan out as planned, I roughed up the layers of color in a few spots with sandpaper in order to get the weathered look that I wanted. Then I added two lines of red on the outer edges of the boards to bring out the color scheme of my living room.
Next was my most risky part of my project. I used a wall stencil (the most expensive part of my project was the wall stencil - why on earth are those so expensive?) and white spray paint to make a fun pattern on the boards. I used spray paint because I wanted the pattern to be a little blurry in most spots. I wanted it to be weathered and worn, not exact and precise. Plus, I knew that if the spray paint method got out of control, I could just paint over it and try again with a more traditional roller or sponge. Lucky for me, the spray paint worked quite nicely. There were a few spots where the spray paint got away from me, but after sanding down all three panels, it looked much better.
Finally I added a layer of crackle gloss finish. Unfortunately I didn't read the directions close enough because I was supposed to apply it before the paint dried. I didn't really get a cracked effect, but at least it added a little shine, which is what I was originally after anyway.
I didn't have an exact idea in my head of what I wanted the final product to look like, (which was probably for the best) but when it was all said and done, I really liked the final product - especially knowing the whole thing cost me less than $20 and most of the needed items I can use again.
I know the mantel still needs some help. This is just a start. I think I will try to incorporate some hydrangeas (fake of course) on the left side of my DIY art piece. I feel like hydrangeas are really trendy at the moment. Beyond that though, well, I have no idea what I should add next.
Thoughts? Suggestions? Advice to help a sister out?


No comments:
Post a Comment